Monthly Archives: June 2013

Thumbs up

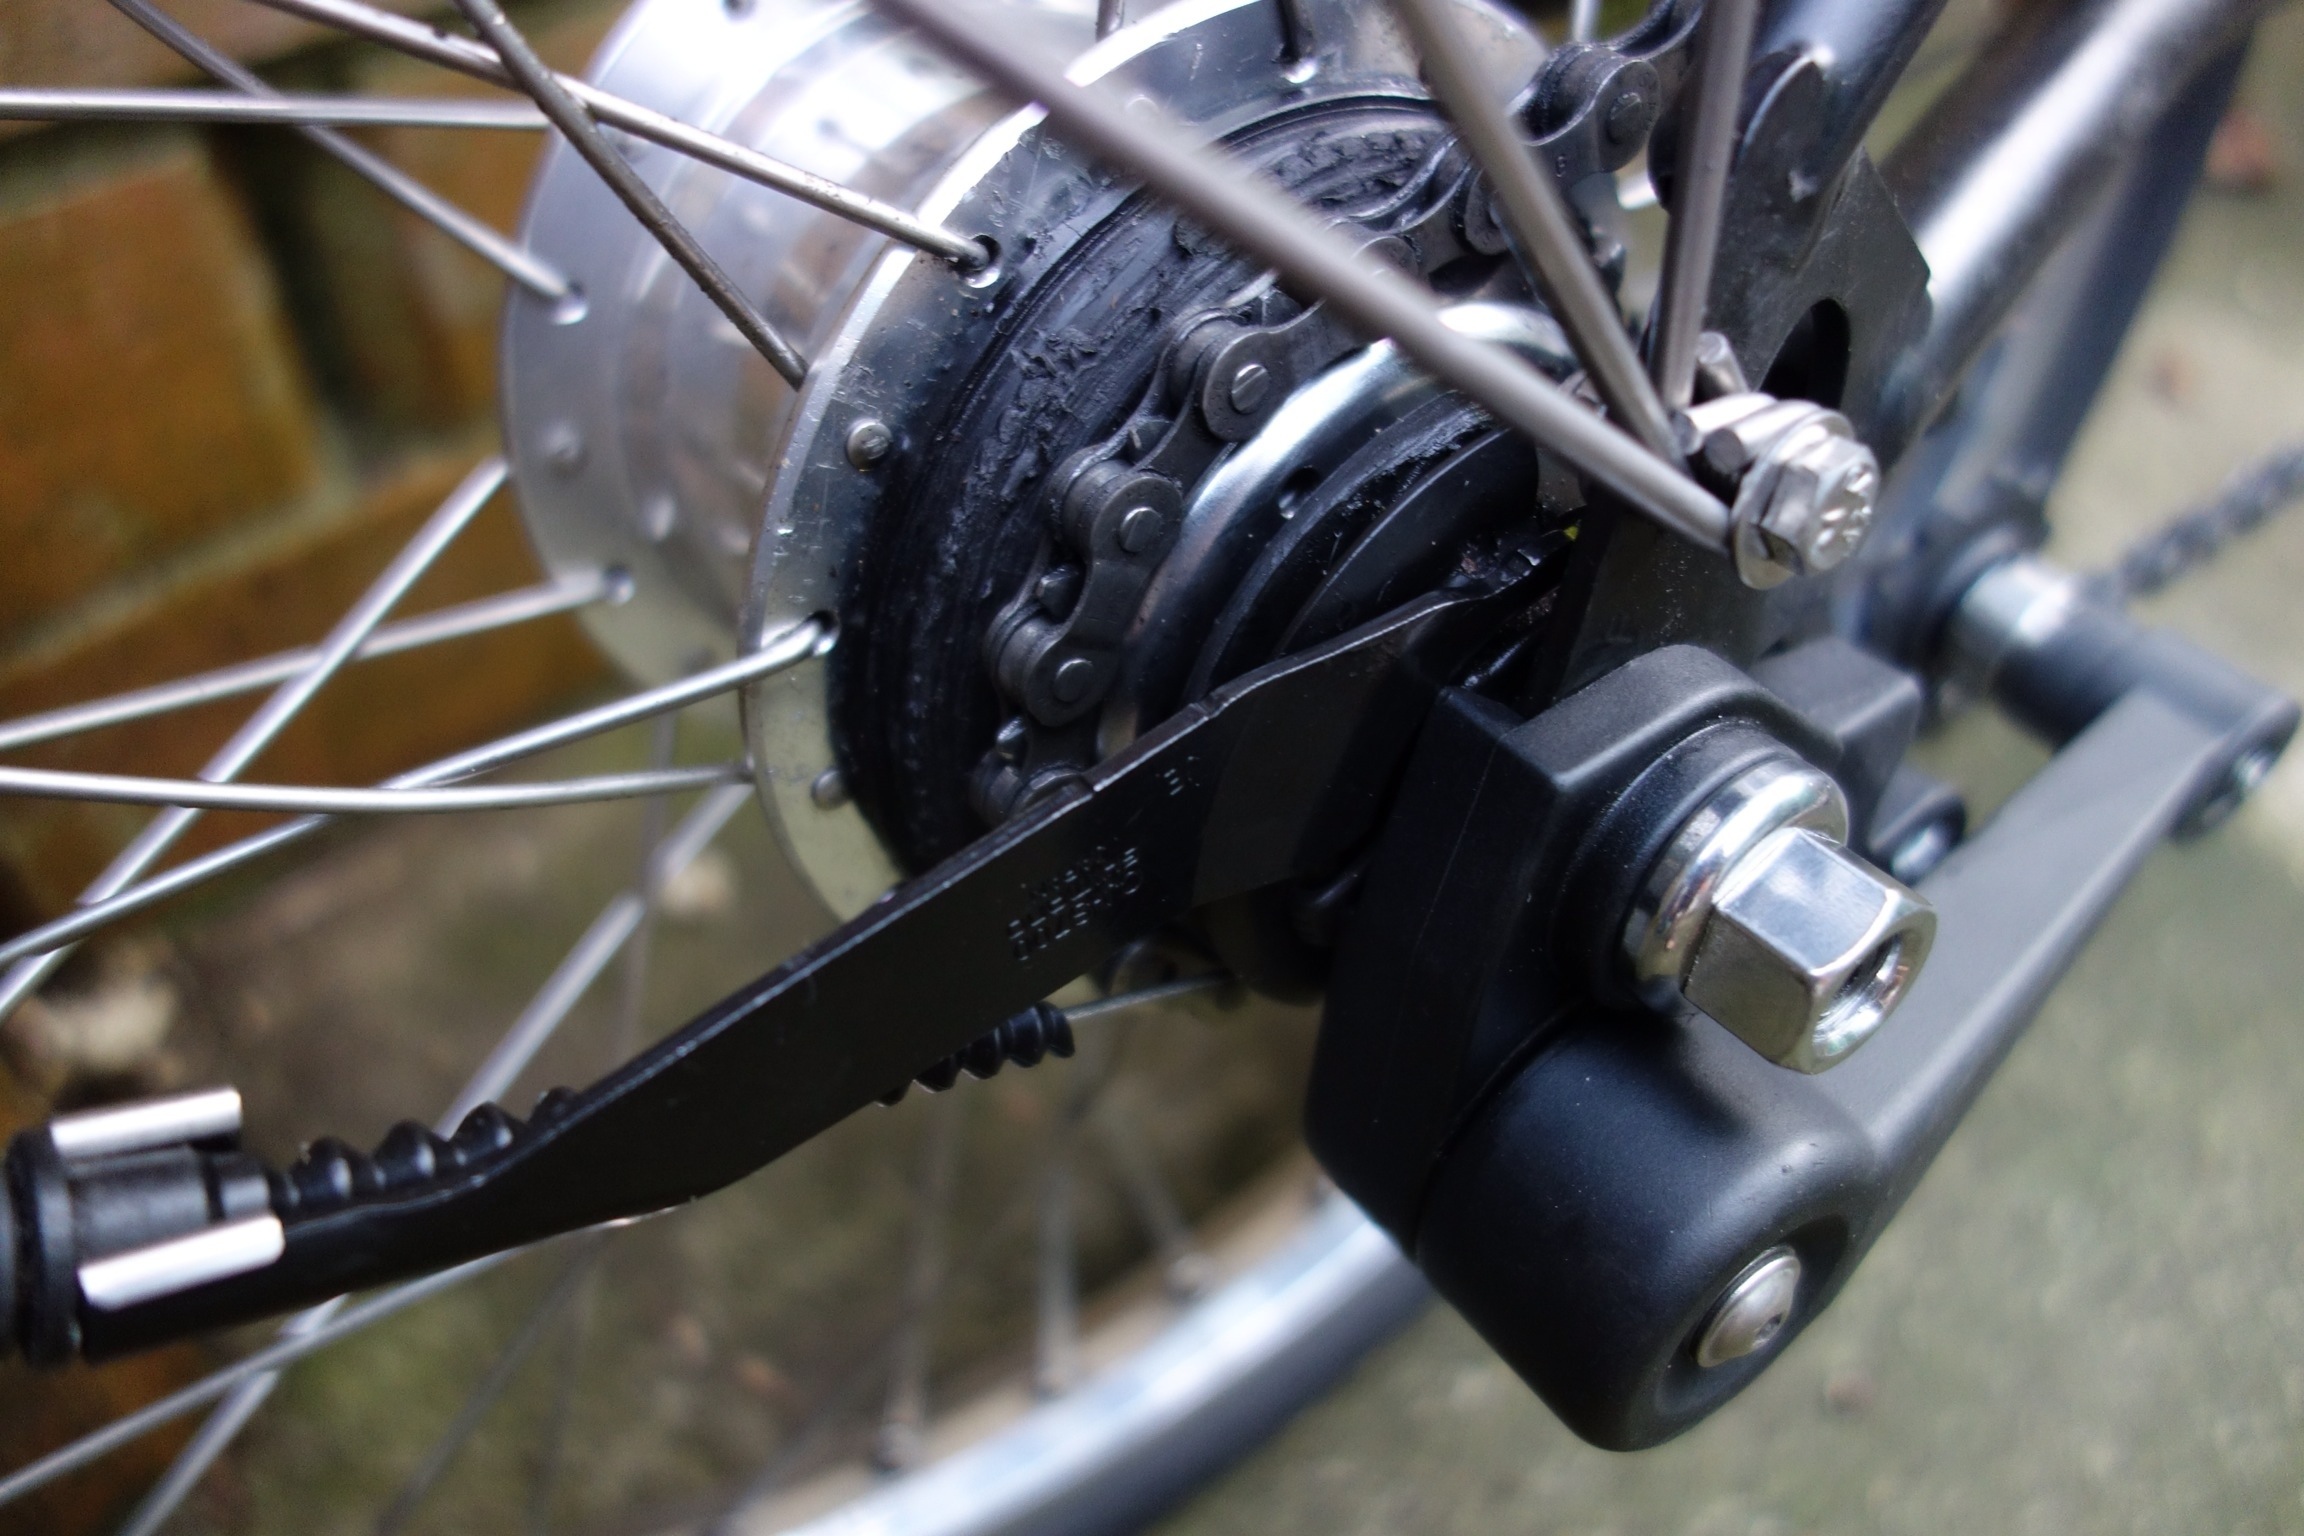
My thumbs have survived today’s task: fitting Marathon Plus tyres onto Ralph, my Brompton Alfine 11-speed. No big deal, you might say? I’m sure some would understand the struggle & pain that can accompany M+ fitment but I’m also sure not many would recognise the significance of my achievement; my Alfine hub is laced to one of those wonderful Sun rims – that have virtually no well, or valley, to the rim profile! Boy, can they be tough for fitting any tyres, let alone the rugged M+ tyres?

I recall the pain when I fitted a new Kojak to the rear wheel. I have never damaged my thumbs as much with a tyre fitting! At the time I hoped never to have to go through that again but now Ralph needs to be readied for an all-terrain trip (& I’d been getting nervous about retaining the Kojaks for it). However, I was confident (or maybe just hopeful?) that I had the answer? You see, some time back I came across some much thinner rim tape – & promptly squirreled it away for future use. Fingers crossed today!

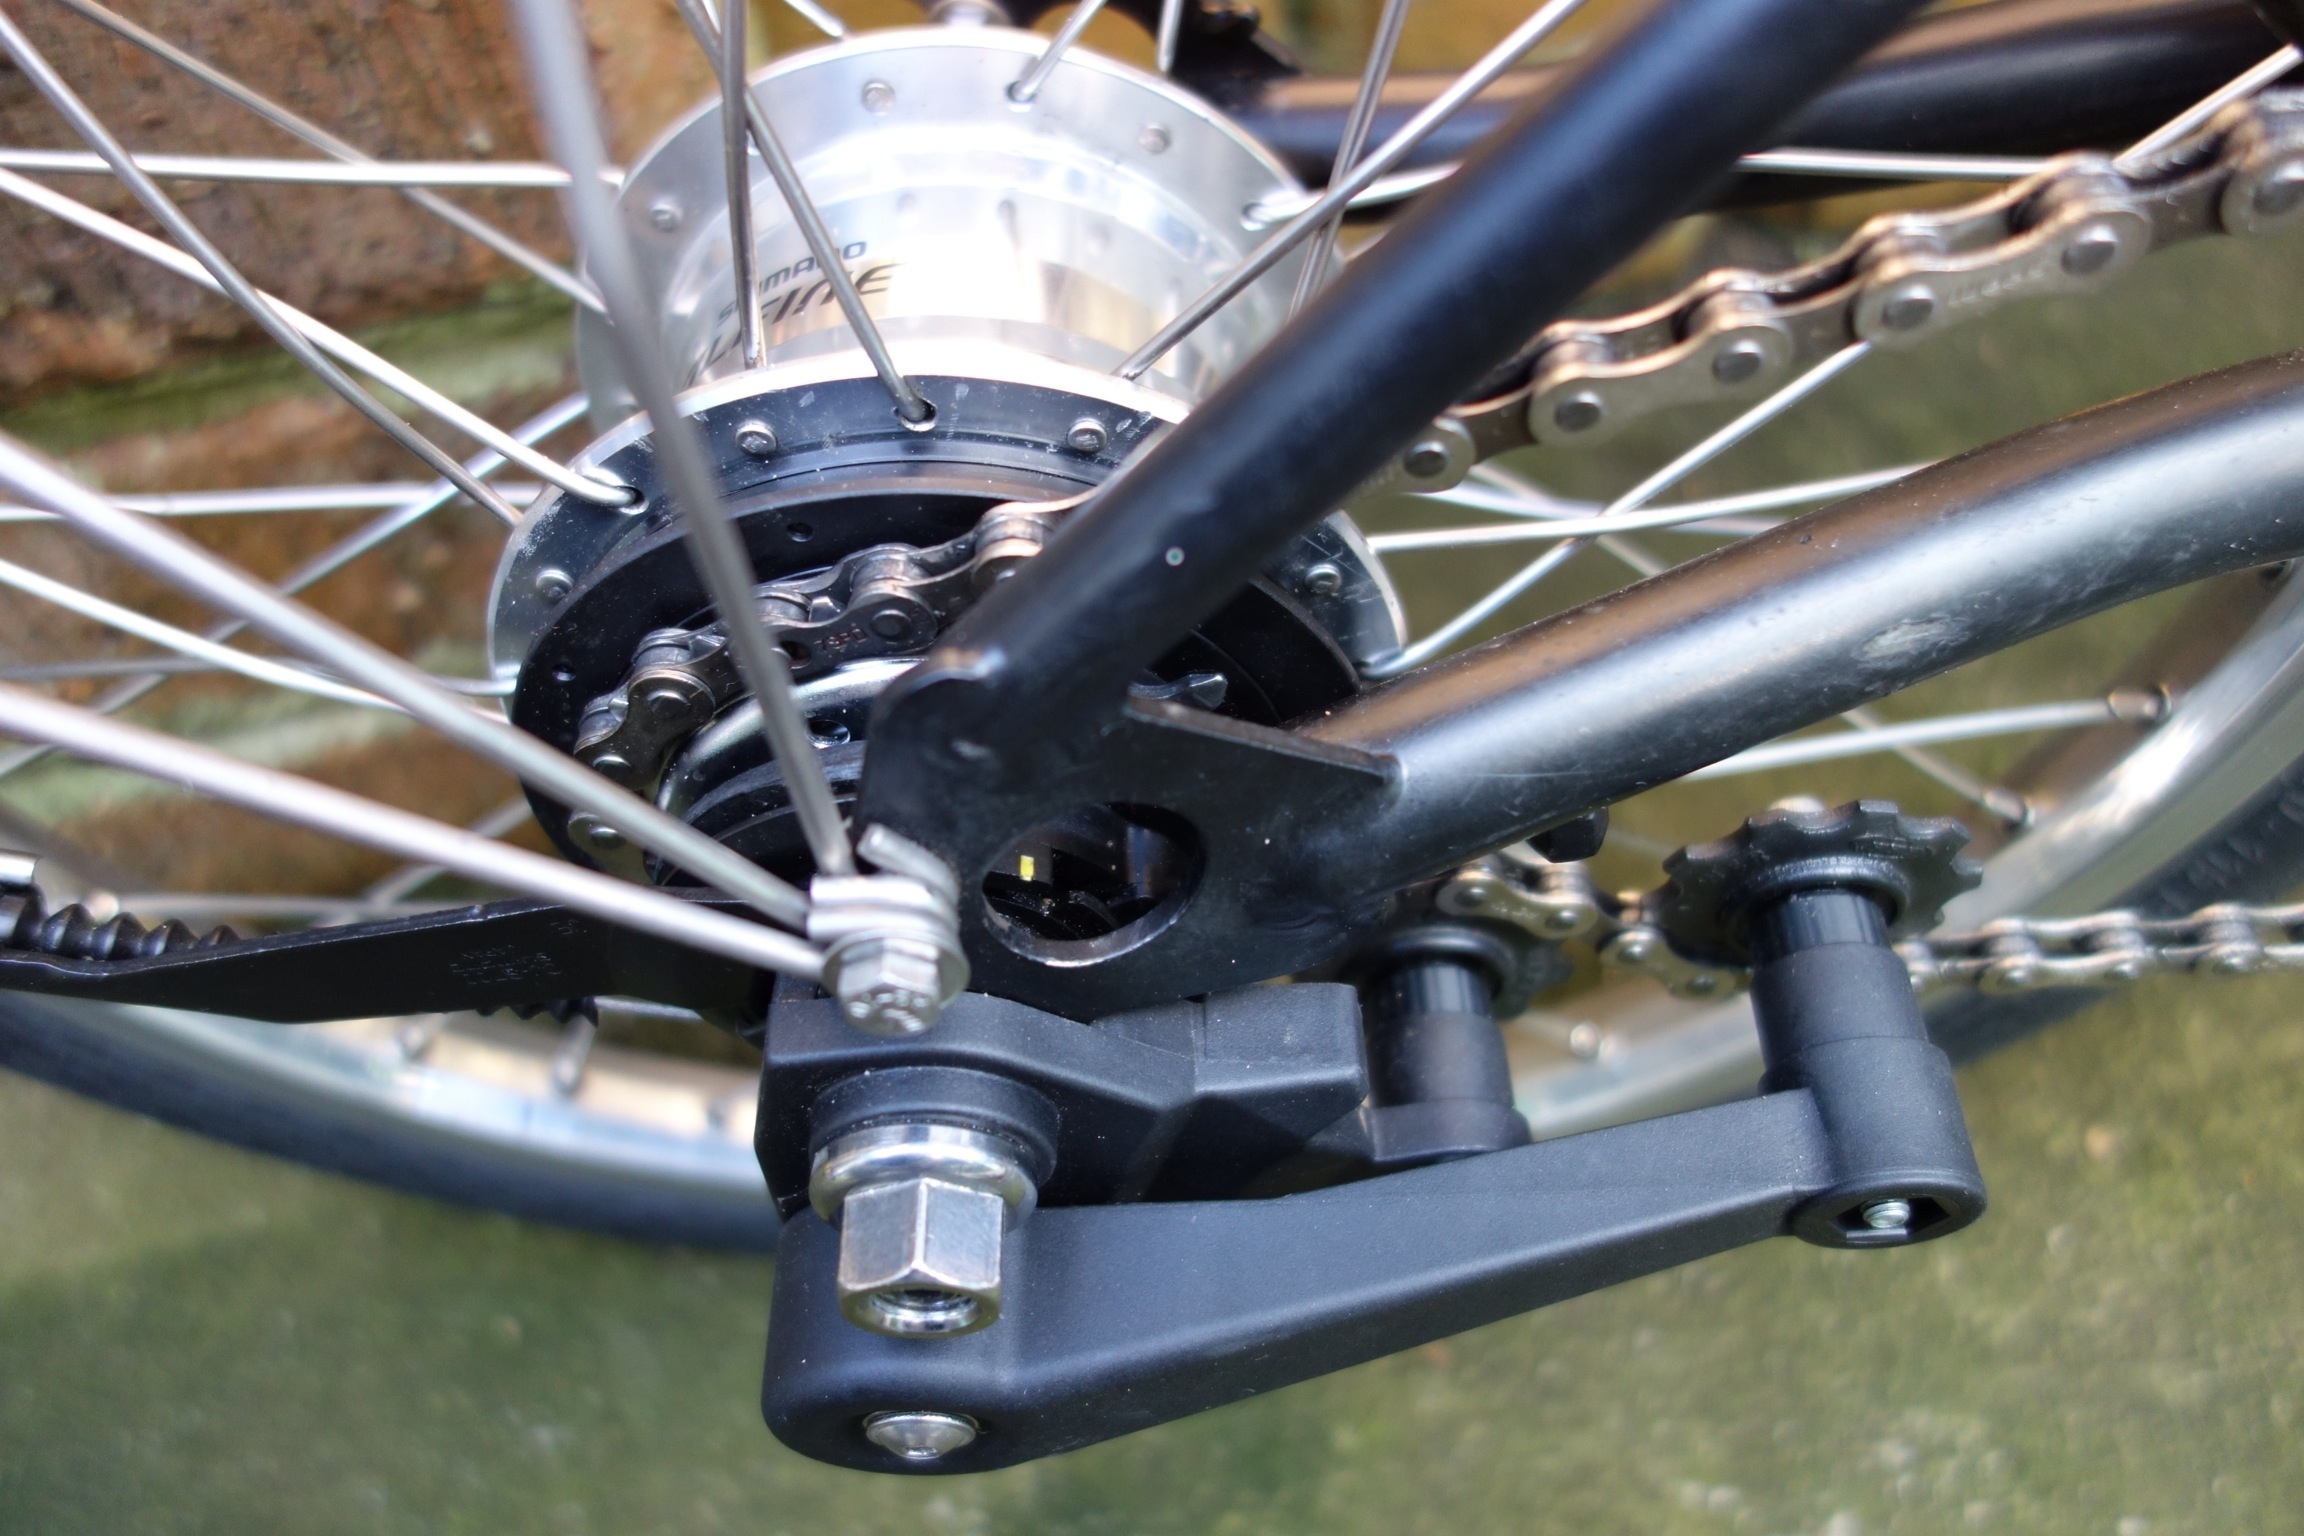
I can’t say that it ALL went well; just the fitting! When I had trouble fitting the Kojak, I never expected to have trouble getting it off! So it was: I actually failed (initially) to get the tyre off with tyre levers! My usual practice is to use a pair of Michelin plastic tyre levers – but no luck! I thought a third lever may do & I then proceeded to destroy a few non-Michelin levers before turning to another Michelin set. Ouch, a Michelin bent & ruined?! At this point I stopped to rest & think. Of course, get rid of the rim tape! A slash & tug of the Velox rim tape & I soon had most of it out – & then had no trouble removing the tyre with my remaining Michelin levers!

From this point it was all straight-forward; first rummage into my squirreled bits box & extract my expected salvation – some BBB 16mm rim tape! (16mm width to suit the flat profile Sun rim, as compared to the 13mm I use on the Brompton rims). On went the tape, hey presto with the tyre (well, a teeny bit of a struggle – after all, we’re talking about M+ tyres!). The front wheel was next & here there’s nothing much to say – easy enough & the thumbs were holding up fine!

The important stats: (rim tape thickness)
Velox – 0.60mm
Zefal – 0.60mm
BBB – 0.35mm
– it made all the difference!

Updated: 29/6/13 – pic of Sun rim profile –

20130629-082624.jpg

Ergon grips fan

Ergon hand grips? I’ve found it bloody hard to do a concise write-up that covers all aspects – so I’ve given up & just present these pointers, comments & notes –

My favourite? GP2-S (wonderfully comfortable for me on Ralph, my S bar Brompton – more so than I expected? because of increased body weight onto S bar bikes, definitely a must!?)

S = small grip size, concentric along length of grip
L = large grip size, ovalised along grip (messy for trimming length?)

GP1 has no bar end, uses cap
GP2 has shortest bar end & likely suitable for S, M or H bar clearances when folded (using them on S & M bar bikes)
GP3 is longer bar end & tried on S bar bike without fold issues – although GP3 does get close to the rear edge of the front wheel when folded (but I didn’t need the longer bar ends)
GP4 & GP5 are longer (make sure they work with the fold! do you really need them?)

I expect the bar caps & ends are all interchangeable (I’ve swapped between 3s & 2s without swapping grips).

Ergons available in 2 lengths: shorter for bikes with grip-shift gear changers, longer for everything else (although I’ve just remembered that there’s a 3rd version that has grip-shift length on one end only!). The shorter grip-shifts may not suit larger hands but don’t need trimming for length to fit with the brake levers (hope I’ve got that correct?). Longer grips will probably have to be shortened for any model bars, depending on brake levers used (& width of hands?). eg My S bars have Shimano brake levers (similar to the latest Brompton brake levers?) with more clearance than earlier Brompton brake levers but moving the levers inwards to avoid cutting the grips wasn’t desirable (fold clearances to cables? grips too wide for my ergonomics?). Moving levers further inwards probably impossible with M or H bars? Grips may be better “notched” (rather than a straight cut) when used with earlier brake levers?

No experience of BioCork grips. May have seen negative comments somewhere about their suitability in sweaty conditions?

Notes:
1. Ergons only clamp to the bars on the bar cap/end area. Make sure you trim enough grip length to ensure the grips are properly clamped!
2. If I was shopping for another set of GP2-S for my bikes & all I could see were GP2-L, GP3-S or GP3-L grips then I’d take them & don’t expect that I’d have any issue for comfort/use?

M bars GP2-L with late model 30° brake levers (my trimming not the neatest?) –

20130625-105822.jpg

S bars GP2-S with Shimano (Alfine) brake levers –

20130625-105841.jpg

M bars folded – GP2-L close to ground but ok (bar ends rotated upwards for riding would probably contact the ground when folded?) –

20130625-105904.jpg

S bars folded – GP2-S plenty of clearance to ground –

20130625-105931.jpg

Ralph refreshed

Ralph has been suffering a bit of late. I could see the chain needing replacement & I wasn’t happy with the chain tensioner alignment, so it was time to take action. My earlier postings on “Ralph’s flaws” probably cover my issues with the chain tensioner & occasional chain loss on unfolding. Having removed the rear wheel & taken off the rear cog for inspection prior to obtaining a replacement to go with a new chain, I felt compelled to look further & wanted to check out a “chewed up” Alfine 11-speed hub seal under the rear cog. I shall not repeat here my embarrassing boo-boo with the seal (refer my “Extra tools” post for the sordid details) but then set out to source all the parts I would need.

Checking an exploded diagram of hub parts, I determined that I needed to obtain the seal (or dust cap, to give it its correct name), a chain guard (missing from Ralph?), rear cog & chain. Thinking I should support the local bike industry, I sought the Alfine parts from Shimano – only to find that I could only get the dust cap by purchasing the whole internal hub assembly! Rather than spend a few hundred dollars (at least?) locally, I turned to SJS Cycles, my UK online Brompton parts source who also deal in Shimano parts. Yes, no problems with the individual parts & everything arrived promptly (about $15 total for the dust cap & chain guard). I had already obtained the dust cap tool via eBay (no prizes for guessing that I couldn’t readily obtain it locally).

The distorted chain tensioner & poorly engineered sprocket wheel mounting (once again, this background in earlier blog posts) were definitely to be addressed but I first needed to obtain better spacers to fit between the sprocket wheels & chain tensioner arms. No luck with finding anything to fit or adapt, so I considered getting some spacers turned out of alloy but then it occurred to me that 3D Printing the spacers would be the ideal solution. A bit of Internet research, a phone call & my simple spacer requirements (no need for me to generate 3D imaging for the basic cylindrical spacer) were produced & delivered in about 2 working days. I’m very pleased with my first foray into 3D Printing!

Refer pics of an ABS plastic spacer & the chain tensioner components – showing new & old (stainless steel) spacers –

20130621-190415.jpg

20130621-190439.jpg

The reassembly work started with grinding a protrusion off the new plastic chain tensioner body (something included for the normal use as a 2/6-speed derailleur unit) & creating a little more clearance to the Alfine gear change mechanism. Then I could assemble the jockey wheels with my new spacers & the chain tensioner was ready for installation. For the rear hub refresh, I fitted the new dust cap & then the chain guard (missing from Ralph & I’m pretty confident that it was left off through being impossible to fit, once somebody had mangled the dust cap through not using the correct fitting tool). The new rear cog went on & was retained by its circlip & finally the gear change mechanism went back on. The rear wheel was then refitted, a new chain added & the chain tensioner attached. Done!

How has it worked out? Ralph is purring! The new dust cap & chain guard now provides less chain drag, noticeable when back-pedaling, which allows the tensioner to maintain pressure on the chain during the fold & unfold operations, thereby curing the chain drop issue? The new chain tensioner & better sprocket wheel support has improved the chain alignment & probably also lessened drag on the chain. (I had thought that the chain drop came just from the distorted chain tensioner, bad chain alignment & maybe from the tensioner spring action appearing to be weak but hadn’t recognised the effect of the damaged hub dust cap.) Ahhh… bliss is an efficient bike!

Before & after pics below –

20130621-190711.jpg

20130621-190735.jpg

Extra tools

I needed an extra tool for maintaining my Bromptons recently & thought it was time to think about serious servicing (ie just preparing; nothing necessary yet). Aside from a sole Brompton dealer in the city area, I’m probably now more knowledgeable about Bromptons than most local bike shops. Converting Robinson, my first Brompton, from 3-speed to 6-speed BWR was an interesting first-up project & it was “highly educational” in researching specs, gear ratios, parts requirements & sourcing. Obtaining parts & accessories has been an issue, with choices of traveling for them, ordering locally (too slow/traumatic?) or ordering online. Here I’ve found a good appreciation of Bromptons is really handy in ensuring I end up with the correct parts. I expect that taking a Brompton in for major servicing is going to very inconvenient for travel or turnaround time (not to mention the worries of local shop service quality or understanding?) & so who better to trust with the work than me? “How hard can it be…?”

So, I’ve now got myself prepared with the various specialised tools that I’ll probably need. (Of course, whether I take the plunge & use them is another matter but we’ll see.) I’ve also found that Internet research on maintenance issues beforehand is a wonderful thing – as long as you think to do it. My recent boo-boo with Ralph’s Alfine 11-speed rear hub dust cap was a bit sobering but it just looked so much like a snap-on rubber seal & it came off & went on (mostly) & all was well – until I put the rear wheel back on. Hmmm… lots of drag in the chain & unrideable? Numerous strip-downs & reassemblies later, I turned to the Internet & found an exploded diagram of the hub parts – & noticed a funny-looking tool. More research & then it hit me: it was to screw on the dust cap! And who would have expected the cap to be secured with a left-hand thread? Hmmm… (Something in my defence was that the dust cap was rather chewed-up & the “tighten/loosen” directions were unreadable. I had thought the marks on the dust cap were from the chain coming off (Ralph does some funny things at times) but on closer inspection I think someone’s “butchered” the cap through not using the correct tool for removal/installation? A new dust cap – & the correct tool – later & Ralph is purring like new.)

Here’s my Brompton “extra maintenance” tools collection (some new although others have seen service on other bikes) –

20130617-190212.jpg

Top row –
Alfine hub right hand dust cap tool
36mm headset spanner set (thin & thick)
Crankset removal tool
Bottom bracket spanner
Bottom row –
Cable cutter
Circlip pliers
Relevant cone spanners

I’m still undecided about the Alfine 11-speed hub lubrication plans… create a DIY oiling kit? purchase the genuine Shimano item? & of course, sorting out the oil to be used?

Finally, a pic of my “office” – ideal for little wheels TLC?

20130617-190303.jpg

Bigger little wheels

20130605-214544.jpg

My 20″ Dahon Vector X27h preceded my Bromptons & was an easy choice for a folder when most of my bike-time was spent on a carbon frame race bike. It has a great road-bike feel & the specs make it one of the best performance folders you could ever want (well, until it’s superseded via the usual later-model upgrade-cycle?). Funny about the 20″ moniker though; the wheel size is 18″ on all the Dahons (& Terns) that I’ve seen.

To say, “what lets it down…” may give the wrong impression; it’s a great bike – it’s just that Bromptons are so good & show it up in the fold & engineering departments. However, being a performance bike it probably lacks some of the versatility that a good folder needs. My Vector has also had a number of upgrades (sometimes just to “correct” the engineering?) & our lives together have been a learning experience (often frustrating but better for the learning?). The one aspect of the spec that is pretty unique is also the item that is (almost) the “Achilles Heel” – the 27-speed transmission, with 3-speed hub gears & 9-speed rear derailleur. Once sorted & aware of the quirks; no problems?

Without any great detail, here’s some notes about what’s gone on –

  • Fitted MKS removable pedals – none supplied (just like a big performance bike?)
  • Added mudguards – for my comfort
  • Added side-stand – so convenient
  • Changed saddle – race-type Kore System saddle swapped to more comfortable saddle “that I just happened to have laying around” (but first needed an adapter to convert Kore System to standard rail system)
  • Swapped to Kojak tyres – great ride on Sydney roads after the rock-like Durano tyres?
  • Installed front derailleur – not for derailing the chain (bike only has single chain ring); just for holding the bloody chain in place (a flaw in short chain-stay bikes having multi-speed rear derailleurs which force the chain to extreme angles?)
  • SRAM dual-drive rear hub – similar ratios to Brompton standard 3-speed; hub changer gearbox with actuator rod & push/pull connection to Tiagra shifter not ideal (too much friction? inadequate cable retention at shifter?); initially very finicky in maintaining adjustment but learnt that axle gearbox needs to be squeaky-clean & well lubed?; rear wheel refitting requires precise gearbox handling to avoid reassembly issues? (acquired skill?)
  • Whoa is me!

    I stopped short of heading out on this month’s “Inner Sydney Explore” Brompton ride because, well it looked rather nasty. Rain & winds aren’t my favourite & I figured it would probably be a solo ride anyway. The ride attempts to educate me about all the latest inner city routes that have developed & I really needed to ensure a non-soggy map. Of course it’s always good to see other Bromptons out & about & maybe the rides will help anyone needing a bit of encouragement?

    I suspected Sunday was not going to be a good day to be out on Ralph –

    20130603-120843.jpg

    We’ll see what Sunday, July 7 brings; it should be my last chance for a couple of months while the Bromptons (& us) head to the UK & the Brompton World Champs. It’s not something I can be competitive in but I’m expecting to enjoy the trip & probably meet-up with lots of Brompton owners – & especially the Facebook Group of London Brompton Club members?

    Ralph’s flaws (part 2)

    After publishing my post about Ralph’s flaws (see https://aussieonabrompton.wordpress.com/2013/06/01/ralphs-flaws/), another Alfine 11 owner has mentioned a bodge that I’d forgotten about – the wobbly seating of the chain tensioner. His fix was to modify the plastic chain tensioner but my solution was different, but first some background of the Alfine hub (& another flaw?).

    Ralph was fitted with “acorn” rear axle nuts (a chrome-steel closed nut with a domed top) but I’m not keen on their “garish” look. Also, I wasn’t happy with the fact that the right hand nut sticks out & comes in contact with the front wheel spokes when Ralph is folded. The answer seemed easy; just replace it with a standard axle nut? That’s when I discovered that unlike the 10mm rear axle size for Bromptons (& probably most other hubs?), the Alfine 11 hub axle is 9.5mm. It proved rather difficult finding a nut to fit the axle & also matching the spanner size of 15mm. About this time I noticed the wobbly chain tensioner & also found that the inner axle nut (that clamps the hub to the rear frame) was equipped with a “clamping shoulder” (like a nut and washer combined). Wow! What were they thinking, to fit a shouldered nut in that position & prevent the chain tensioner from butting against the rear frame? (ie the nut shoulder was too large to go through the hole in the chain tensioner & hence the chain tensioner wobbled around on the shoulder)

    I did manage to locate a 9.5mm axle nut but it had a “captured washer” as part of the nut & was unsuitable. So, out with the Dremel & I ground the top off one of the acorn nuts, to be able to use that as the inner axle nut. The shouldered nut then got used as the outer axle nut that holds the chain tensioner in place. Now the chain tensioner fits correctly & the front wheel spokes aren’t striking the rear axle nut when Ralph is folded. All ok? Well, the various axle washers are another bodge & I’ll replace them when/if I find something appropriate.

    Well done if you’ve been able to keep up with all the above, & you’d probably be saying, “…but doesn’t that still leave one acorn nut on the left side of the hub?” Yes, I’d like to replace that too but it means I’d also have to grind that nut down – & also grind down the axle to shorten it to match the nut length! Sorry, I think I just might go ride the bike & leave the acorn nut in place.

    Sigh… I’ve really come to appreciate the thoroughness of the original Brompton engineering & can only smile when I hear someone say, “How hard could it be, to…”

    Ralph’s flaws

    What!? A Brompton with faults? Well, Ralph is a rather special Brompton, having been fitted with a Shimano Alfine 11-speed rear hub but unfortunately, it wasn’t Brompton who engineered this installation.

    The concept of the multi-speed hub, fitted into a widened rear frame & using a single trigger shifter for gear changing, is great – but in practice, some engineering aspects of the fitment leave me wondering, “what were they thinking?”.

    First, the mating of the Alfine hub to a Sun rim used “3-cross” spoke lacing, which had the spokes leaving the nipples at a slight angle thereby creating stress in the spokes. When I purchased Ralph there were 2 broken spokes & I immediately arranged for the wheel to be rebuilt with “2-cross” spoke lacing. I have read that Shimano recommend 3-cross lacing for Alfine hubs but I imagine Shimano were assuming a full-size wheel rim & not the small Brompton wheels? What was the wheel-builder thinking?

    Something unfortunate for Ralph (principally me?) was the use of the Sun double-walled rim, with an almost flat internal profile (ie minimal “well” in the rim shape), making the fitting of new tyres a great struggle. For the present I have refrained from researching any possible alternatives; something for the future?

    My next, “what were they thinking?” Is reserved for the cobbling of the chain tensioner. While the usual Brompton single-speed or 3-speed bike chain tensioner doesn’t suit the widened rear frame, the use of the Brompton derailleur (from 2 or 6-speed bikes) was an ideal/clever choice. What hasn’t been ideal is the method of relocating the jockey wheels by fitting “bike parts bin” spacers that bear up against the ends of the thin-wall tubes of the plastic derailleur arms. For Ralph the inevitable has happened & the derailleur arms have now distorted, with the jockey wheels at slight (different) angles to the chain.

    Another flaw for Ralph has been an occasional dropping of the chain from the rear cog when unfolding the bike. My assumption/expectation is that the distorted derailleur & misaligned sprocket wheels are creating resistances in the chain run during unfolding & not allowing the derailleur to maintain chain tension. Owing to an imperfect chain-line deriving from the Alfine build (did I mention that Brompton didn’t engineer the Alfine build?), a loss of chain tension allows gravity to kick in & for the chain to be dragged off the rear cog when the chain moves during the unfold operation. I feel I’ve become quite adept at sensing the feel/noise of the chain dislodging & effecting a good clean remount?

    Well, that’s the summary from my 6 months with Ralph; nothing that currently stops me from whizzing around on my favourite Brompton – but Ralph deserves better & a new derailleur is on order, before I turn to correctly engineering the jockey wheel mounts.